


Manufacturers have multiple packaging options for optimizing adhesive performance.
Two-component (2K) adhesives are becoming increasingly prevalent in a variety of manufacturing applications—including electronics, medical devices, aerospace, transportation and basic assembly—because their predictable cure times allow these processes to be managed with greater control and efficiency. Many 2K adhesives are packaged in cartridges that range in size from 1-1,500 ml with ratios from 1:1 to 25:1. Regardless of cartridge volume or ratio, the packaging considerations needed to optimize adhesive performance are the same.
Trapped Air Risks
The most important requirement when packaging 2K materials is to eliminate any trapped air that could affect the ratio and mix of the A and B components. Air trapped within the components will compress under pressure and expand when pressure is released. When this air expands, it can cause the material to surge as it exits the cartridge, resulting in off-ratio dispensing (commonly known as “lead-lag” because one component “leads” while the other one “lags”).
Air can be introduced into the adhesive at several points: as it is being manufactured, during shipment, or when it is transferred from the original bulk containers to the cartridges from which it will ultimately be dispensed. Air that enters the material during manufacturing or shipment can be removed either by applying vacuum or by centrifuging the bulk container. Once this has been accomplished, several methods can be used to transfer the material into cartridges without the risk of further air entrapment.
Cartridge Filling Considerations
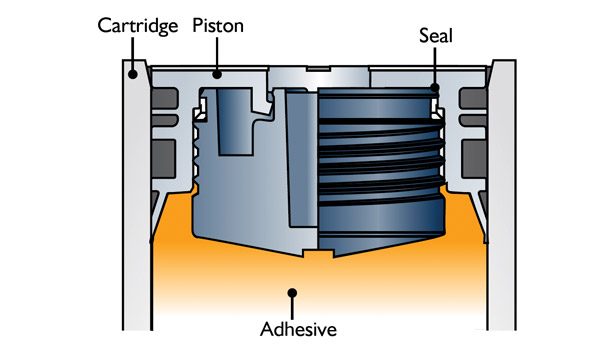
Cartridge systems are comprised of a cartridge, pistons and a nose plug. The outlet of the cartridge may be open or closed, depending on the design. The most common method of filling cartridges is from the back. With the nose plug installed, the cartridge is placed upside down in a fixture. Material is pumped through mandrels that are inserted into the cartridge bores before the pistons are inserted.
As the cartridge fills, it is either pulled away from the mandrels or the mandrels are lifted slowly out of the bores to keep air from entering the material. Regardless of the method used, the fill height should be carefully monitored to ensure that enough room is left for the pistons to be inserted correctly.
High-viscosity adhesives require special care. If the cartridge is pulled away too fast or the mandrels extracted too quickly, these thick materials can fold over themselves and create air pockets. If this happens, the cartridges should be centrifuged before the pistons are inserted.
A less common means of filling cartridges is through the nose or outlet in a process known as backfilling. Since the outlets on closed cartridges remain sealed until use, they cannot be backfilled. During backfilling, the pistons are installed at the bottom of the cartridge in the fully dispensed position, the plug and retaining nut are removed from the outlet, and the cartridge is attached to a manifold designed to fit the orifice.
As adhesive is pumped through the manifold and into the cartridge, it pushes the pistons back. Care should be taken to ensure that the pistons do not get pushed out of the cartridge, as most cartridges do not have a means to keep this from happening. Once both cartridge chambers have been filled to the correct level, the plug and retaining nut are installed to close the system.
Piston Options
Packagers can choose from several piston designs, each with its own way of bleeding air from the space between the adhesive and piston. The first type is the solid piston, which can incorporate either one or two lip seals. During the filling process, air is bled by using a shim (typically fishing line) to create a small opening between the piston and the inside wall of the cartridge, so that air can exit as the piston is pushed into the cartridge. Shim materials that will not damage the lip seals should be used. When all of the air between the adhesive and piston has been purged, the shim is removed.
Another piston design is the center bleed style. Like solid pistons, this style employs lip seals, but with the addition of a small hole in the center that allows any air between the adhesive and the piston to escape. Once all the air has been removed, a plug (either preinstalled or supplied as a separate component) is pressed into place to close the center hole. When using this type of piston, it is extremely important to not push the plug into place too soon, because it cannot be reopened without damaging the piston. When using preinstalled or “pre-staged” pistons, pressure should only be applied along the piston circumference (not the center plug) for the same reason.
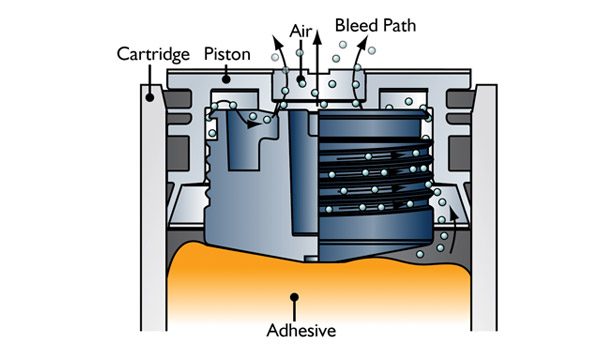
One drawback of the center bleed design is that higher viscosity or non-self-leveling adhesives tend to form a peak in the center of the fill, which can prematurely close the bleed hole and trap air around the outer edges of the piston. For this reason, self-bleeding pistons with a vent that allows air to escape as the peak of material is forced to the outer edge are recommended for use with high-viscosity materials.
One such self-bleeding design features an umbrella-like plug that is pushed down to open the venting area. The piston is inserted to a certain depth inside the cartridge and, when force on the piston is released, the umbrella retracts and closes the vents. A new type of self-bleeding piston also features a preinstalled plug that automatically closes the vent when all of the trapped air has been removed. As the piston is pushed into the cartridge, air bleeds out around the circumference while the force generated as the piston face contacts the adhesive pushes the plug into place to close the vent.
The adhesive is ready to be dispensed once the cartridge has been filled. Sometimes, however, one side of the cartridge may be filled to a slightly higher or lower level than the other. To ensure a proper A-to-B mix, it is important to equalize the cartridge by bringing both pistons to the same level so that both components are dispensed simultaneously. This can be accomplished by removing the plug and retaining nut and dispensing a small amount of the A and B components until both materials are flowing at the same time.
Static Mixer Styles
At this point, a static mixer (typically spiral or square) is attached to the cartridge. The spiral mixer is a tried-and-true design that has been around for a long time. Over the last 10 years, however, adhesive formulators and cartridge manufacturers have been moving to the square design. Square mixers can provide several significant benefits compared to their spiral counterparts:
- 40% shorter length allows the user to get closer to the point of application
- 40% less retained volume minimizes waste
- 10% less backpressure reduces hand fatigue when manually dispensing from a cartridge
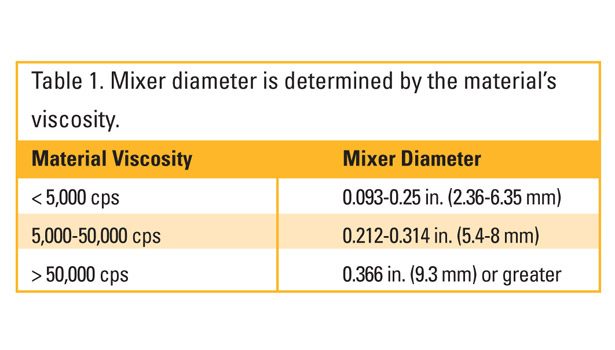
Both square and spiral geometries are offered in different diameters, with different numbers of elements (“turns”) and different outlet configurations to meet specific adhesive and application requirements. Mixer diameter is based on the viscosity of the adhesive, which can be found on most adhesive data sheets or the MSDS. Small diameters are typically used for low-viscosity adhesives, while high-viscosity materials require larger diameters (see Table 1).
Thixotropic materials (which become fluid when shaken or stirred, and return to a gel state when allowed to stand) are the exception to the guidelines. Since their viscosity drops during dispensing, it is common to use the next smaller diameter.
The type of adhesive being dispensed, whether it is epoxy, urethane, silicone, methyl methacrylate or urethane foam, determines the number of elements (see Table 2). It is important to note that if the maximum recommended number of elements for a particular adhesive has been reached but optimal mixing has not been achieved, it is best to change the mixer diameter based on where the adhesive ranks in the viscosity-to-diameter chart.
Careful attention should also be paid to the technical data sheet to understand how the adhesive is intended to perform. Take note of the shelf life, gel time and set time, because these factors can have a tremendous impact on adhesive performance. For example, if the gel time is 60 seconds, the mix will start to deteriorate when that time is reached due to the adhesive gelling and sticking to the elements and mixer housing wall. In such instances, it is best to attach a new mixer to the cartridge when the adhesive gel time is reached, in order to ensure proper mixing and adhesive performance.
If some adhesive remains after the application is complete, the cartridge can be capped with the plug and retaining nut, and saved for future use. The mixer can also be left on the cartridge to protect the material from exposure to air. If the amount of adhesive remaining in the cartridge is insignificant, it should be dispensed and properly mixed. Once cured, it can be disposed of without environmental impact.
For more information, contact Nordson EFD at 40 Catamore Blvd., East Providence, RI 02914; phone (401) 431-7000; email info@nordsonefd.com; or visit www.nordsonefd.com.


