Qualifying an XYZ Robotic Adhesive Application for Freezer Assembly
An appliance manufacturer successfully upgraded its freezer assembly process from an outdated XY-applied hot-melt pressure-sensitive adhesive to a fully automated XYZ application.
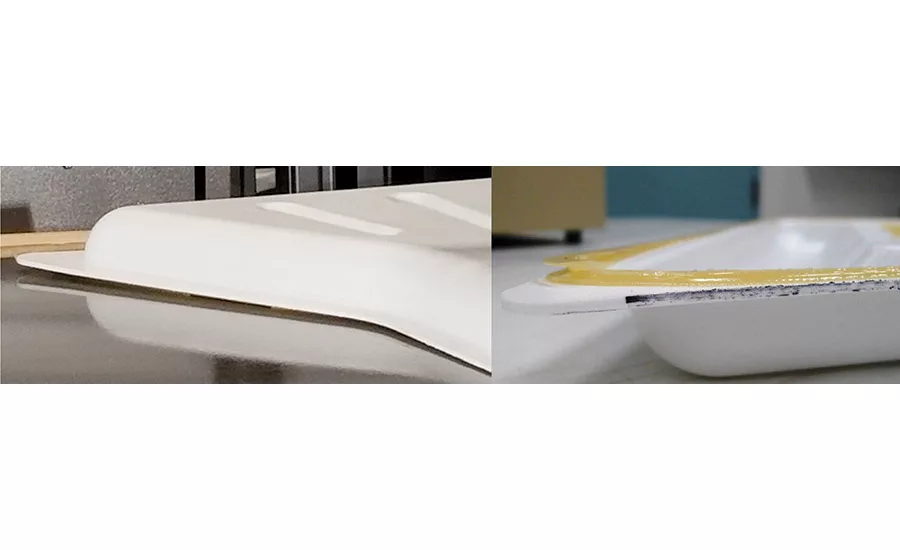
Figure 1. Warped air ducts result in unacceptable adhesive pull-away.
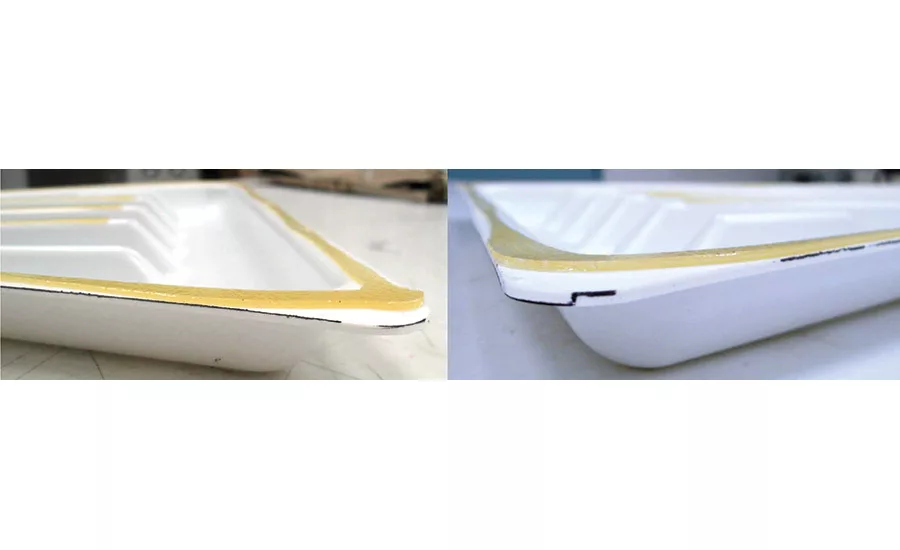
Figure 2. Acceptable adhesive press-out on an air duct.
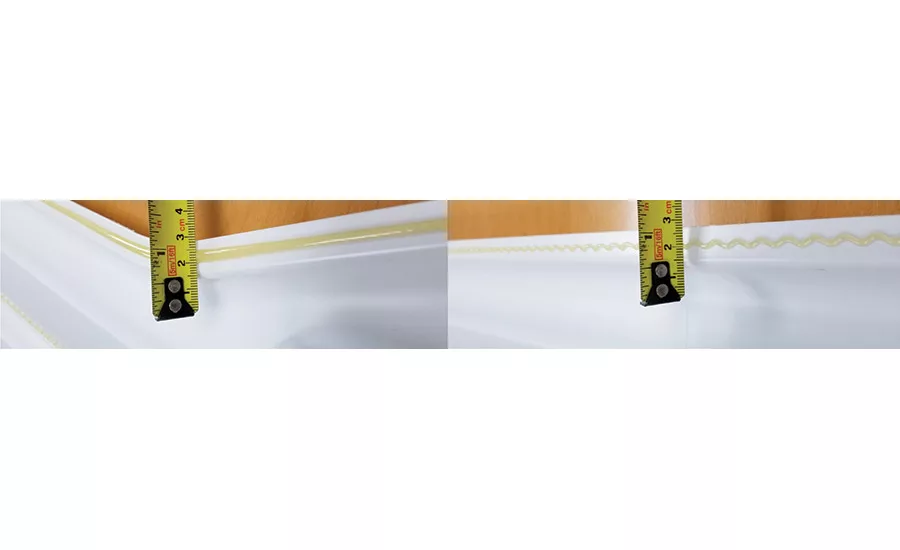
Figure 3. Acceptable adhesive bead pattern on the perimeter (left) vs. unacceptable (right).
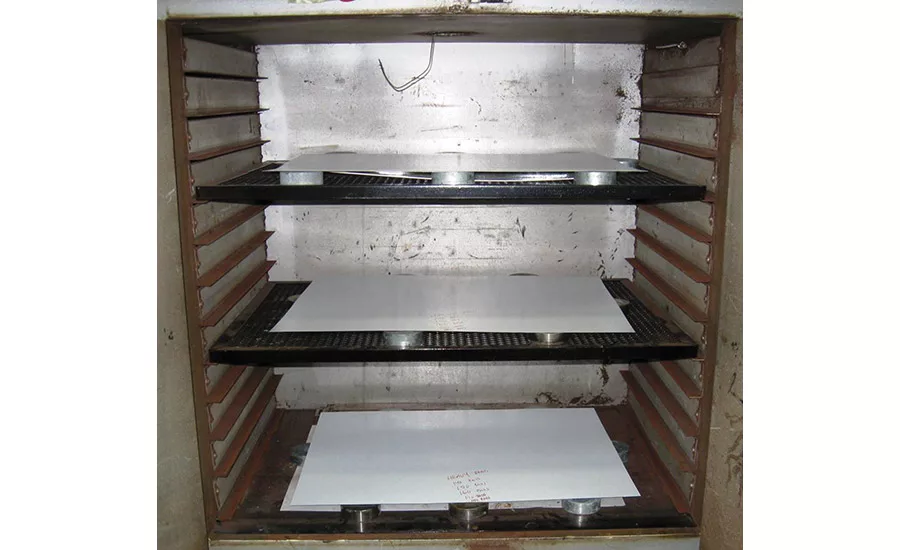
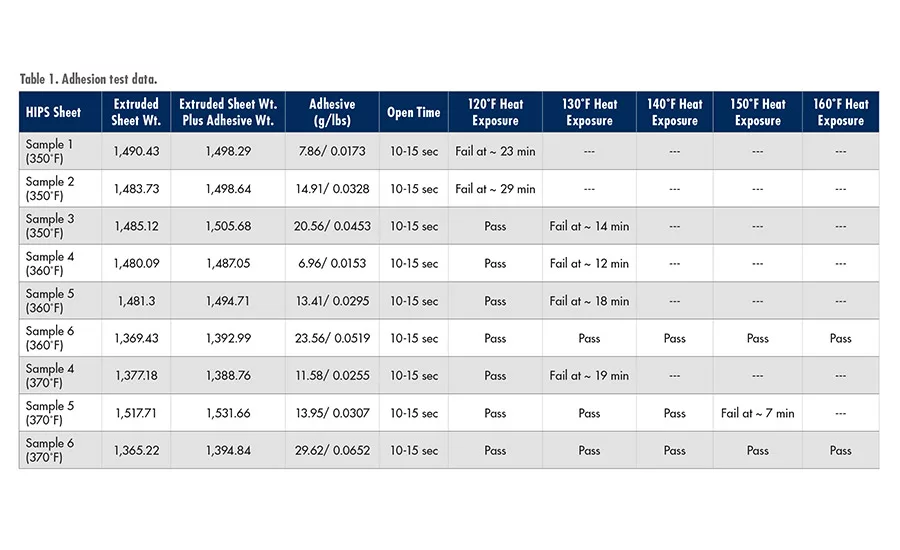
Figure 4. Tests were conducted on six different adhesive samples.
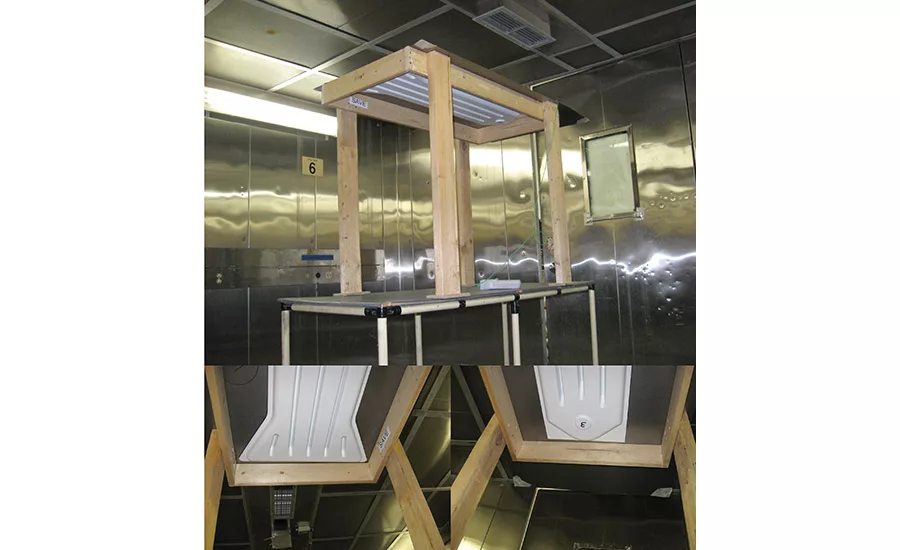
Figure 5. The heat stability testing frame for the hot chamber. The plastic panel went into the oven inverted, hanging upside down on the pre-painted steel.
Electrolux is a global manufacturer of appliances ranging from washers and dryers to water heaters and dishwashers. The company’s St. Cloud, Minn., Manufacturing and Quality Assurance (QA) departments had identified a loss in productivity and inconsistent quality in its freezers. As a result, an internal team involving seven Electrolux departments in St. Cloud set out to upgrade from an outdated XY-applied hot-melt pressure-sensitive adhesive (HMPSA) to a fully automated XYZ application process.
At issue was a seemingly underperforming HMPSA. The Manufacturing department’s stopgap of reinforcing the HMPSA with large quantities of 2-in.-wide masking tape, which also required more labor hours, was driving up production costs. Equally important was the issue that the plant’s target for the number of freezers assembled per shift was not being met. An internal consensus was reached: the stopgap had to be replaced.
Representatives from Electrolux’s Manufacturing, Quality Assurance (QA), Manufacturing Engineering, Maintenance, Electrical, Materials Engineering, and Purchasing departments regularly forged solutions through ad-hoc teams to improve plant operations. In this case, the company’s Purchasing department reiterated that Manufacturing’s stopgap was exceeding its bill of materials for the freezer application’s masking tape and labor. QA identified vibration noises in the freezer’s air duct subassembly, resulting in a higher-than-average service call rate (SCR) in the field. The Manufacturing Engineering, Maintenance, and Electrical departments wanted to update unreliable, outdated adhesive application equipment and operating software to mitigate escalating maintenance costs.
Having identified these multiple objectives, the department representatives deployed an ad-hoc development team to address the HMPSA application and the SCR vibration noise. The team’s first order of business was to establish benchmarks.
Attachment Process
Attaching the air duct to its liner involved the same HMPSA/masking tape-reinforced application regardless of the freezer’s size (e.g., 13, 17, 19, or 21 cu ft), although the air duct and liner dimensions increase proportionally with freezer size. The larger air ducts and liners manufactured for 19-21 cu ft freezers required more HMPSA and tape.
The upright liner was constructed of coil-coated steel. The air duct substrate was a high-impact polystyrene (HIPS) constructed from an extruded sheet that Electrolux thermoformed to specification for physical dimensions that properly regulated airflow.
The attachment method used by Electrolux for the previous 20 years required an XY hot-melt applicator to dispense the HMPSA on a specific area of the reverse side of the liner. After dispensing the adhesive, the liner part advanced on the assembly line approximately 5 ft to the next process area, where workers placed the air duct precisely on the liner’s adhesive joint. Workers then taped the perimeter of the air duct to the backside of the liner to secure it. Without masking tape, the parts would not remain attached when advancing through the pre-heat foaming operations. Figures 1-3 illustrate some of the issues related to adhesive application in this area.
From there, the air duct would advance through a few more stations, where the liner would be rotated to expose its interior for attaching plastic breakers to the liner. A worker would drop the liner into the cavity of the upright shell, and then fit the breakers to the shell. This step resulted in an open cavity between the two parts.
The assembled shell and liner then advanced to a preheated forced-air oven (temperatures ranging between 115-135°F) for approximately 2 min. Preheating ensures the urethane foam migrates to the nooks and crannies of the cavity (between the liner and the shell) for uniform foam density distribution. Next, the high-pressure urethane foam would be injected into the cabinet (i.e., the preheated shell and liner with air duct), filling the cavity within 6-7 sec. The “foamed” cabinet would remain undisturbed in the cure oven for 4-5 min to ensure that the urethane foam was completely cured.
This step-by-step attachment process was originally designed without masking tape. However, Electrolux’s HMPSA often became unstable following preheating and prior to curing, resulting in a bond break. Tests revealed it couldn’t withstand the 135°F process temperature for 2 min. Manufacturing resorted to using 2-in. masking tape to avoid a HMPSA failure (i.e., detachment of the air duct from the liner) following preheating.
SCR Noise Mitigation
Separately, a vibrating noise inside one freezer model had been detected. The air, which is cooled by the evaporator located behind the freezer compartment, is blown by the freezer’s evaporator fan unit and passes through the air duct to the freezer compartment. The evaporator cover has a few plastic ribs that allow air to flow through discharge holes located on the fan louver. Vibration occurred with contact between the plastic ribs and the exterior coil-coated steel liner.
Having knowledge of the internal evaluation that was underway and the pending HMPSA substitution, QA realized they could kill two birds with one stone: Why not muffle the vibrating noise with an adhesive?
Engineering a Solution
The central issue that Electrolux’s Engineering and Quality departments faced was how to facilitate process control by delivering precise (repeatable) adhesive dispensing results in the air duct-liner attachment (to eliminate the need for reinforcement with masking tape) while concurrently applying adhesive to the plastic ribs for SCR noise reduction. The team believed a new XYZ robotic adhesive application was the answer, but there were plenty of details to work out and variables to test.
Manufacturing, Manufacturing Engineering, and Quality collaborated on the optimization method to meet the required 23-second cycle rate. Manufacturing Engineering evaluated a few different robots for a two-step process. The robotic arm would pick up the air duct and articulate it (XYZ movement) under the hot-melt adhesive nozzle to apply adhesive to the perimeter of the air duct. Following this operation, the air duct was immediately articulated under the next three glue guns to apply adhesive to the center ribs. The goal was to not exceed the 10-sec open time of the adhesive before placing and pressing the air duct onto the back of the liner.
The team recognized that the real challenge would be selecting an adhesive with the desired pressure-sensitive characteristics (mainly tack) and with higher viscosity. High viscosities mitigate excessive running of the adhesive to the edges of the bonded joints; in this application, the adhesive flow shouldn’t extend beyond the edges of the air duct. The desired thickness was indicated for longer heat retention (slower setup) and for proper wetting-out to the pre-painted liner.
Laboratory Testing
Six different adhesive samples were tested (see Table 1 and Figure 4). The successful selection was predicated on Electrolux’s laboratory protocol using a pre-painted steel panel and a handheld hot-melt adhesive dispenser. The adhesive supplier provided the correct application temperature, and Electrolux’s Purchasing department specified the required amount of adhesive to properly regulate cost, which was by no means a trivial calculation.
Testing was then performed on the dispensing of various adhesive bead sizes ranging from 1/16-3/16 in. Given that a smaller adhesive bead size carries fewer calories of heat, the smaller bead size was quickly ruled out. Testing involved timing the dispensing to obtain full coverage, with desired thickness and rigidity over the perimeter. Concurrently, the bead size was tested to facilitate proper wetting on the ribs to ensure bonding to the plastic and adherence to the polyester backer coating of the pre-painted steel. A specifically regulated adhesive temperature was required to provide the proper amount of open time (for mating of the air duct to the liner back) and best wet-out to the two substrates.
The most effective method for obtaining the recommended calories of heat for this application involved experimenting on an extruded sheet of plastic that was approximately the same weight as the air duct. Various bead sizes and amounts of adhesive were tested with various temperature characteristics.
The dissimilar substrates (plastic and pre-painted steel panels) were pressure tested to ensure accuracy and uniformity of the degree of pressure the application required. As shown in Figure 5 (p. 32), the plastic panel went into the oven inverted, hanging upside down on the pre-painted steel, to validate the oven temperature target, with a testing range of between 125-145°F (and up to 160°F as an experimental control). Multiple tests verified that when the correct amount of adhesive was applied, the bond between the two parts met production requirements.
The laboratory test involved a manual application of adhesive to the substrates; therefore, the next phase of testing involved validating the 23-sec cycle time. In that timeframe, the robot had to grip and lift the plastic air duct, then position it beneath the hot-melt glue gun, applying adhesive around the perimeter of the air duct and then applying the beads to the ribs for noise control. The final process step was to invert the air duct in 10 sec or less and place it on the liner, holding a constant degree of pressure on the two substrates for 2-3 sec.
Testing on the Plant Floor
When the laboratory testing results were satisfactory, the testing had to be performed in the production area. Because the new robot hadn’t yet arrived, the crew used the available hot-melt application equipment to test the adhesive formulation. Attaching the hot-melt gun to the in-house XY manipulator, the team performed testing to validate the amount of adhesive needed in manufacturing. That process proved successful without using masking tape; however, dispensing the adhesive in the correct location proved challenging with the XY manipulator. Nevertheless, the process at this stage looked promising for the adhesive selection.
When the team cut out the back side of the liner to check for urethane foam leakage, a failure was detected. Eventually, the bead size, temperature, and amount of adhesive were validated. The required 23-sec cycle was met, and the urethane foam leakage was resolved.
XYZ Robot Applicator Installation and Testing
Now the capital expense of the XYZ robot could be approved by Manufacturing with confidence. The testing had to be repeated on the new XYZ robot, including the timing sequence, bead sizes, and 23-sec cycle time. The last step involved fully programming and integrating the XYZ robot according to the application parameters into the assembly operation. Smoothing out the cycle times, bead size, and all the corresponding adjustments took Manufacturing Engineering a few weeks to complete, with Quality overseeing the rib adhesive application for noise reduction. To meet the required cycle time, Manufacturing Engineering increased the adhesive temperature once again to speed up flow of the adhesive through the hot-melt gun.
Finally, a run-off test was conducted with a short production run on 120 air ducts and pre-painted liners (all freezer sizes were represented). The result was successful in full production mode following several adjustments to the program and several rib realignments that involved weekends, lunch breaks, and the third shift for nearly a month. Syncing the 10-sec XYZ robotic adhesive application around the perimeter of the air duct, followed by applying adhesive to the plastic ribs, was memorable (mating the bonded substrates must occur quickly to prevent contamination of the bond surface). Dialing in the targeted amount of adhesive to meet cost requirements was equally laborious.
Ultimately, every automation goal was met, including the elimination of the masking tape reinforcement (and lost productivity) and reduced labor resulting from the attachment of the air ducts to the liners. The vibrating noise was mitigated, reducing the SCR in the field.
Upstream Production Anomalies
In real-world manufacturing, Murphy’s Law dictates that even a streamlined operation will occasionally fail. This process was no exception: a part would be missed or damaged upstream of the adhesive application, causing the line to stop. The solution involved programming the software to go into QA mode if, after 30 sec, the adhesive was not dispensed. This mode entailed dispensing the adhesive into a Teflon-coated pan for testing the adhesive temperature. If the adhesive temperature was too hot, the adhesive was dispensed several more times into the pan and then discarded in order to purge the overheated material and to reset the temperature.
Purchasing cited its concern that the QA mode added cost to the process (i.e., excessive adhesive was used). Manufacturing and Manufacturing Engineering reviewed the frequency of deploying the QA mode and its added cost, eventually concluding that there wasn’t a less-costly alternative. The QA mode was therefore adopted over Purchasing’s objections.
Additional unexpected manufacturing anomalies were troubleshooted from time to time, but nothing proved too difficult to resolve. The ad-hoc team had replaced an outdated, inefficient 20-year piece of machinery. Electricians in the Maintenance Department had fewer maintenance issues and less downtime; they were satisfied with the improved reliability outcome.
Testing for Success
Electrolux was able to determine its adhesive selection requirements through extensive testing—first in the laboratory, then on the production floor, and finally in a third round of testing that was performed on new XYZ robotic adhesive application equipment that had to be financially justified prior to approval of the capital expense and equipment integration. Not unexpectedly, the three testing environments produced variations in the testing results. Production involved bonding dissimilar substrates, mitigating a vibrating noise to which consumers objected, and eliminating masking tape as a reinforcement to a seemingly underperforming HMPSA. In reality, the HMPSA simply couldn’t withstand the process temperature that reached beyond the limit it was formulated for.
OEM value chain participants involved with different applications can learn plenty from this situation. For example, temperature and humidity affect surface energy (polar and dispersive components), liquid viscosity, surface tension of the liquid, application dynamics, and curing dynamics. Application testing of adhesive products and substrates in an environment that simulates a wide range of environmental conditions can help to narrow down the proper performance window and aid in the development of
new materials and formulations that perform more robustly over larger application ranges.
Adhesives formulators should be proactive and access testing protocols and real-world manufacturing environments that accurately simulate their end customers’ factory conditions. The same resources are available to end users that need them.
For more information, call (412) 781-1320 or email alotz@chemquest.com, or visit www.chemquest.com. Electrolux can be found online at www.electroluxappliances.com.
Looking for a reprint of this article?
From high-res PDFs to custom plaques, order your copy today!


